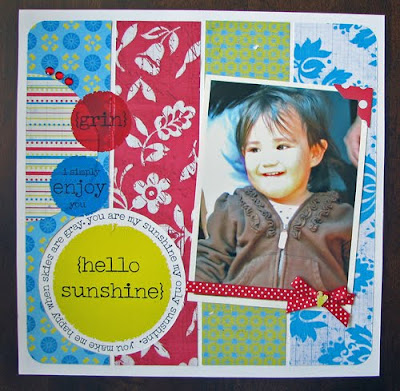
Happy Wednesday!!
Hope you all are enjoying your Summer, making memories, and taking LOTS of pictures!!
The Simply Obsessed July kit is PERFECT for all of your summer pics. The colors are so vibrant, bright and fun! I am in love with the color combo. You can't go wrong with this kit. It is sold out, but if Heather has enough requests for these kits, she will order more!! I promise you, this is one kit you want to have! :)
"You Make Me Happy"
"Silly Faces of Summer"
A double!! I haven't done a double layout in soooo long! Just had to use all of these silly pics of the kids.
I have a card too, but we have been fighting rain via Hurricane Alex. As soon as I get a picture, I will post! :)
~Ronda
Wednesday, June 30, 2010
Tuesday, June 29, 2010
Jenny's Hello Sunshine Reveal
Oh my goodness, I know the other girls have said this already, but July's Simply Obsessed kit is fantabulous!!!! The colors are absolute perfection for summer. I just worship that teeny tiny little Maya Road banner Heather included. I made a super cute little banner to use on my personal blog. I broke out the paints on the larger banner triangles and on the tiny stars and hearts. I even added a little Martha Stewart snow glitter before they dried. To finish it up I covered the smaller triangles with the Lily Bee paper and punched circles and yummy YELLOW Thickers from the kit. Like sooo...
This next one is my favorite. It doesn't hurt that my hubby (who is deployed) is center stage, but I just love how easily this page came together. I didn't realize until I was finished that the photos with the handcut paper beneath sort of form a heart. Do you see it?
Had fun cutting up the Lily Bee's rub-ons for this next one. I cut the yellow sun rub-on from the larger words rub-on. Next, I cut a large circle out of the blue cardstock and layered a photo of Sophia behind it and the words around the opening. And from there, I just went a little circle crazy.
scrappinJen
Monday, June 28, 2010
Karry's Hello Sunshine Reveal!!!
Wow, can I just tell you how much I LOVE this kit? I know I'm not alone since the kit has already sold out. But goodness, if you can get your hands on this kit you will be so happy. I know Heather is trying to get together a reorder, so don't hesitate to let her know if you want one!!! I did 3 pages and have tons more goodies I haven't even touched yet. I can't wait to get back with it and play some more!!! It's bright and happy and is just perfect for our summer pictures!!!
Let me show you what I did, I hope I did this kit justice!!
Life with you...
How can you say no to that face? *rofl* It's Chloe during one of her regular drama queen moments. When I showed her the picture, she tried so hard not to smile. You know that look. lol This page is all kit goodies exept for the Kraft CS, the red Target $ spot letter stickers and some buttons from my stash. I am in love with those Niki Riki thickers! I want them in all colors now. So much fun and they are just the perfect size.
Redneck Princess:
Yes, that IS mud on Chloe's face. We had rain for a solid week last month, so my husband had lots of fun mud holes to drive the 4 wheeler through. They had SO much fun and got SO dirty! They had to wash off with the garden hose before they came near the house. Chloe said being a redneck sure was fun.
This is all kit goodies except for the buttons. I can never have enough buttons! lol Even the little black scallops are from the kit....they came from the rub-on packaging! They were just too cute to throw away.
Hello Sunshine:
I love this picture. Chloe is such a nut head.
This page is all kit goodies, right down to the CS. I just love the banner that came with the kit, you could do so much with it! I slapped a little paint on them, covered the tops with pretty paper and stacked them. I loved the dimention it added. This may have been the second or third time I have EVER used a rub on! I couldn't believe it was so easy. The big one, I was just too chicken to put it right on the page. So I put it on white cardstock then cut it out. I believe it would have done just fine to put it right on the page, but I just wasn't confident enough. lol
These pages where so much fun! Thanks for looking!
Friday, June 25, 2010
Misty's July Reveal
OMGoodness! I fell in love from the moment that Heather posted the little sneaks of what to expect in the upcoming kits. My mouth began to water the moment I opened my box that contained my kit, and I got all giddy as I began cutting paper. Everything about this July kit is amazing! The colors, the embellies, the papers...absolutely everything perfectly compliments one another, and gets those creative juices flowing. So far, here is what I was able to create...and I do have more stuff, so I will have more layouts!
First up is my "Hello Sunshine" card. I used the big ol' rubon to create the front flap of my Sun shaped card. I did use my own ribbon to tie it together.
Next up is Laugh....I used the flags and the rub-ons and the buttons...just everything! These photos are of my daughter...in sequence as we took this photo shoot....First grinning, then singing, then laughing hysterically at herself! I just adore these photos and did not want to split them up into individual layout...as they show the true beauty of her nature...always smiling and happy!*I did use my own polka dot ribbon.*
Last is "Content" This is my daughter in my Mom's arms at the park about 2 years ago. Skye did not want to play, did not want to slide, did not wany anyone else to hold her...only Memaw. As I look at this photo, though, I kinda have to ask myself...Who looks more content? Skye or Memaw??? Hmmmm...that is a good question! LOL
Thank you for taking time to look at my reveal! It was sooooooo much fun to work with this YUMMY kit!!! i still have a bit more yumminess to play with, so I see another layout or two in my future with this kit!!!!
Thursday, June 24, 2010
Sarah's Hello Sunshine Reveal
Hello Sunshine is right!!! I just love this kit!!! My favorite part is those cute, cute, cute Lily Bee rubons. I just couldn't resist using those on both of my layouts. I usually stay away from rubons, but these were just too perfect not to use. So here is my July Hello Sunshine reveal.
For my first layout I cut some of the Lily Bee paper into strips. I wanted the big yellow rubon as my title, but it didn't show up very well on the patterned paper. So I cut a circle just a little bigger than the rubon, traced it on my paper and then cut out the circle. This left me a spot to place to my title!
I knew exactly what I wanted to do with this layout when I saw that "life with you" rubon. I cut out strips of the Lily Bee paper, punched them, stitched them and then adhered them to the blue cardstock from the kit that I trimmed to 10.5 inches. I journaled on the bottom all the adjectives that describe life with Frances. Exhausting and tiring are both on there- LOL! On the hand stitching I used yellow chalk to turn the white thread yellow so it matched my paper a little better.
And for my last project I made this little card. It is a 4 x 4 card. I added a button to the flower and inked two of the chipboard banner pieces to make leaves. Then see the red paper on top? I cut that out from the label strip on the bottom of Fancy Pants paper. I didn't want that to go to waste after I cut it off!!
I hope you enjoyed my Hello Sunshine Reveal. I love this kit!!! I have lots more paper and embellies to make more projects!!! This kit is SOLD OUT, but if you love it as much as I do you can contact Heather (simplyobsessed@yahoo.com) and she will order one for you!!!
Tuesday, June 22, 2010
Susan's Hello Sunshine Reveal
Love, love, love this kit! It is sold out, but Heather will order some more if you let her know you want it. AND YOU DO WANT IT!! HERE is the thread in the message board so you can put your name on the list. This kit is very versatile. I have completed these three layouts and have 2 more in the works. One is even a Christmas layout! Well, on with the creative stuff!
"Chloe"
This is our West Highland Terrier, Chloe. She is for once clean (she doesn't know she is suppose to be a fancy dog! She loves nothing more than to chase critters, swim in the bayou, and generally just get filthy!) She is also constantly trying to keep everyone in line as she sees fit no matter if it is human or another canine. Can you say bossy! Everything on the layout is in the kit except the ribbon and twine. Those are from my stash. I used MM Blue Lagoon Paint and a paint called Fresh Foliage to paint the banners. The letters are the yellow ones from the kit. I just peeled off the top layer because yellow did not suit the layout. The border was cut from one of the MME papers. Love that Lilly Bee Rub-on. It was just perfect to relate our story about living with Chloe! I really love the colors here!
"Hello Sunshine"
Now, I ask you who could resist using this big rub-on as a title? Not me! I used lots of small pics and rub-ons here. I even made the red envelope from the kit card stock that holds my journaling tag. I punched the confetti stars and sprinkled them around with the rhinestones from the kit! Love this one too! My daughter, Bryn, and my nephew, Cameron, are having a blast shooting each other with water in the bumper boats. They had a blast while we were in Hot Springs.
"Thoughts on You"
Here they are again. This time playing put-put golf. Funny!!! This one includes my thoughts about the two of them as a pair. I hand cut the paisley shape and popped it up. I used a rub-0n on a punched scalloped circle and adhered it to the paisley. Again the ribbons and twine are from my stash. Hope you get your hands on this awesome kit. I can't wait to get back to my other two layouts! have a great day!
Friday, June 11, 2010
Simply Obsessed & Bella Blvd
team up to give you a fantastic give away! Simply Obsessed has been featured on the Bella Blvd Blog! Head on over for your chance to win the June Obsession Man of the House!
Tuesday, June 1, 2010
A Little June Color Inspo From Jenny
The first time I opened up the magazine I wondered aloud, "What in the world is this?". I mean why would my mom (bless her sweet heart) send me a subscription to Traditional Home magazine?!? I mean, c'mon, I'm a mostly single (hubby is almost always deployed) mom of five younguns. While I would loove for our home to look like something out of a magazine, but... HA!!! There's just no way. But, as I continued flipping the pages, I slowly began to understand. Mom didn't get it for me as a subtle nudge to start redecorating, it's a great source of scrappy inspiration. The pages are filled with beautifully decorated homes with furnishings to inspire endless embellies. The ads are spectacularly designed. I could lift each one of them. But, I mostly love the color combos it provides me. My Color Challenge is for you to take a gander at this ad from Waverly and make a scrappy layout using the color scheme as inspiration. K?
For this 2-page layout, I used the foreground in the Waverly ad as inspiration for my kraft cardtock base. And the rest of the bright springy, retro-flavored colors of the houses inspired the rest. What do you see? What inspiration can you gather from this fabulous ad? I know I'm going to re-visit this add at a later date to lift the layout design, as well. Would love to see you use this as a color inspo for your next page. Please link us up in the gallery at Simply Obsessed!
Karry's June Title Challenge!
Can you believe it's June already? This year is just flying by! My challenge for you this month is a Title Challenge! With Father’s Day just around the corner I thought we could honor them in our June challenge. My challenge for you this month is to use a discriptive adjective in your LO title. You can scrap about anyone or anything you want, just make sure you include an adjective or two in your title. Some examples of adjectives are: amazing, fabulous, handsome, awesome, incredible…..groovy. :-) Those are some great words we could use to describe the men in our lives, right?
Here is a comprehensive list of adjectives. There are quite a few in there you could use for this challenge.
Mom's Who Think - List of Adjectives
Here is my example:
I used the June's Bella Blvd. kit for this challenge. The words from the Bits A Bella paper fit my challenge perfectly! (Believe it or not, I chose the challenge topic BEFORE I got my hands on the June kit!) I can’t wait to see what y’all create. Happy Scrapping!
Sarah's June Make N' Take
Hello June!!! Father's day is almost here. Do you have a card yet? If not you can make one of these nifty gift card holders! What man wouldn't love a gift card to Home Depot or Best Buy? I know my DH surely would.
I saw a gift card holder like this on one of the manufacturer's blogs. I just can't remember which one it was. I simplified it a little and made a few changes here and there to make it a little easier, but it is not my idea alone. I am just passing on the inspiration.
Here's what you will need:
1. The June SO kit! It's perfect for Father's Day or birthdays. But if you don't have the kit yet a sheet of cardstock and some patterned paper will do.
2. A circle punch (Mine is a two inch diameter)
3. A gift card!
And that's it. Pretty easy to put together. So let's get started!
Step One: Trim cardstock to 4 3/4 by 12 inches.
Step two: Fold carstock in half.
Step three: Fold each side in half again to make an accordian like below.
Step four: Trim 1/2 inch from the top and bottom of the two middle sections as shown below.
Step five: Place adhesive inside the card along the two pencil lines below. This will make our gift card pocket.
Step six: Decorate the inside.
Step 7: Punch a third of a circle from the top of the gift card pocket.
Step 8: Decorate front, add gift card and hide until Father's Day.
These would be perfect for birthdays, showers, thank you's, etc. Happy June and Happy Father's Day!
I saw a gift card holder like this on one of the manufacturer's blogs. I just can't remember which one it was. I simplified it a little and made a few changes here and there to make it a little easier, but it is not my idea alone. I am just passing on the inspiration.
Here's what you will need:
1. The June SO kit! It's perfect for Father's Day or birthdays. But if you don't have the kit yet a sheet of cardstock and some patterned paper will do.
2. A circle punch (Mine is a two inch diameter)
3. A gift card!
And that's it. Pretty easy to put together. So let's get started!
Step One: Trim cardstock to 4 3/4 by 12 inches.
Step two: Fold carstock in half.
Step three: Fold each side in half again to make an accordian like below.
Step four: Trim 1/2 inch from the top and bottom of the two middle sections as shown below.
Step five: Place adhesive inside the card along the two pencil lines below. This will make our gift card pocket.
Step six: Decorate the inside.
Step 7: Punch a third of a circle from the top of the gift card pocket.
Step 8: Decorate front, add gift card and hide until Father's Day.
These would be perfect for birthdays, showers, thank you's, etc. Happy June and Happy Father's Day!
Photography Challenge
This is definitely a challenge for me! I am for sure an amateur! Since I have been out in my yard working in my garden, i thought a good challenge would be to photograph nature. Whether it be your own garden, the natural countryside, or wildlife. Let me see what you see while you are out and about. Here a some photos I took in my garden to inspire you.
Water Lily in my Fish Pond
Pink Impatiens growing in our big live oak tree
Cajun Hibiscus "Voodoo"
Sorry about the photo size. They will not resize, but you get the idea. So link your entries to THIS POST on the message board. Can't wait to see what you find! Susan
Water Lily in my Fish Pond
Pink Impatiens growing in our big live oak tree
Cajun Hibiscus "Voodoo"
Sorry about the photo size. They will not resize, but you get the idea. So link your entries to THIS POST on the message board. Can't wait to see what you find! Susan
Subscribe to:
Posts (Atom)