Friday, May 28, 2010

Ronda's June Reveal!!

Good Morning ladies!!
Have you purchased your June kit yet??? This kit is packed full of such fun goodies!! I LOVE the colors in this kit, and it's perfect for those masucline LO's , cards, and projects!! The June kit is definitely a must-have!!!
Here is what I did with the kit!!

"My Guys"

"Mister Smarty Pants"

Father's Day Card

Hope you have a GREAT Memorial Day Weekend!!!

~Ronda

Wednesday, May 26, 2010

Karry's June Reveal!

Good morning! This is my first kit reveal and I am just too excited! This kit was so much fun to work with. I have the hardest time finding manly paper that I just love, so this kit was a wonderful surprise. It is gorgeous, the colors are so warm and yummy. The papers are so versatile, I love the mix of gorgeous patterns. I could just keep on and on creating with it.

My first page is of my husband early last spring on top of Mt. Currahee, it's our closest mountain. It's not very big, but it still a nice view and a fun way to spend the afternoon! :D The words on the page and the buttons are mostly Badda Bing chipboard with a few from the Bits A Bella sheet. The title piece is from the Billboards sheet. Love it! Those pieces where so much fun, the possibilities are endless with the wide variety of shapes, words and buttons! I am also in love with those cute little Jenni Bowlin copper stick pins.


My second page is a picture of my husband from last month. You have to scrap the icky along with the good, right? lol I think this might have been our third trip to the emergency room in as many weeks. :-( My poor husband felt like he had been bulldozed. Kidney Stones are NO FUN! The "Never Give Up" circle, the Mr. Tough Guy strip and the journaling dot are from the Bits A Bella paper. The strips underneath the pic are also from that same paper. The word "Not" is the Cosmo Cricket chip letters. I used some Badda Bing chipboard to help it pop a little. The buttons and the little accents are also Badda Bing. The Sun Corral Bazzill is also from the kit. The only thing from my stash is "again" .


This card is the Coastal Blue Bazzill from the kit. I used some of the Basic Gray Capella gummies and gorgeous flowers on here too. The Billboard pp was perfect for my card! The Blue and white pp is from the Bits A Bella paper. The Cosmo Cricket letters worked great for my card too.


With this card I used some stitching and distressed all my edges to give it some texture. The Badda Bings accents where just perfect to complete my simple little Father's Day card!


Well that's all folks, thanks so much for taking the time to look at my work. I just loved working with this kit. I hope you enjoy it as much as I have! Happy Scrapping!

Tuesday, May 25, 2010

Susan's June Reveal

Happy Tuesday and ALMOST summer vacation to you! We have just four more days to go here and this teacher can't wait!!! How about some more exciting news? The June Kit from Simply obsessed is just great! I was wondering just how these colors would work for me, but they came together so easily. Here is what I came up with.
And He Says "The Girls Like Me"

This is my first ever 8 1/2 x 11 layout and I really enjoyed working with this size. I see more of these in my future. The photo is of my oldest son Sean at the "Very Special Prom" at his high school. This prom is held for students and past students of the special education classes here. He looked forward to it for a long time and while getting ready he informed me "The Girls Like Me!" Oh boy, what do we have in store for us? The Kraft colored letters are just the Cosmo ones that came in the kit. I just peeled the top layer off because I thought this color better suited my layout. The tiny brown alphas are from my stash. This extra long title required lots of alphas!

"2 of a Kind"

I used a sketch from Magpie to complete this one. This is my husband and daughter hanging out. They are very much two of a kind! I cut the blue circles out and used them to create a scalloped border.

"Sometimes I Wonder"

This layout features a photo of my father when he was six. i just love working with old photos. I love the color combo going on here. Notice the flower at the top. I just cut a circle from the orange cardstock and cut out the blue diamonds on another paper and used them as the petals. I hand cut the star and journal tag also. i know this will be one of those layouts I treasure.

"World's Best Dad" Card

Finally. a simple card for Father's Day.

This is a great kit and I loved working with it. Make sure you snap yours up. Have a wonderful day, Susan

Monday, May 24, 2010

Sarah's June Reveal

Ahhh, my favorite time of year! It is so nice outside, school is ending and the June kit is a rockin'!! I had so much fun working with this kit. I love that it has a masculine feel to it, but also has some pretty feminine touches like those awesome Basic Grey flowers and gummies, gorgeous Jenni Bowlin t-pins and the metal Making Memories metal accents. I couldn't resist making one girly page and one boyish page. Hey, I had to throw pink there somewhere or it just wouldn't be me right?

My girlish layout is "Girl's Day Out". Frances and I played hooky from school one day and went to the zoo while Daddy was at work. It was a fun girls day out. I made the Man of the House papers more feminine by adding a pink ribbon from my stash, punching some "lace" paper, and using the Jenni Bowlin t-pins. There was also some pink the gummy I used. I used the Thickers from last months kit (Crate Paper Pink Plum) and doodled on them with my white pen.


My boyish layout is "the Little guy". This is my little guy Bacon. We call him the little guy because he is only seven pounds. I carried him around like a baby before baby Frances moved in with us. He is getting older now (a whopping 17 years) so we cherish these little moments with him. I used some little alphas from my stash to complete the title and my label maker for the journaling.


And for my last project I made my Dad a Father's Day card. This is the perfect paper for father's day!


Have a great June and have fun with the June Kit!

Friday, May 21, 2010

Jenny's TRUE Man of the House Reveal

Where do you find scrappy inspiration? I found some while scrolling through some handmade goodies over at Etsy. Can you find which of my June layouts was inspired by this little stationary set? You may even find a little inspiration here today as I share my Man of the House projects with you.

Happy Friday Simply Obsessed Fans! As soon as I received my June Man of the House kit, my mind began to churn. I don't get a lot of time to sit down and scrap with my hubby deployed overseas and me being the only caregiver to our 5 kids. So, whenever I can, I think scrapbooking. I tossed around the thought to use this kit to document my current "Man of the House". He's 2 inches shorter than me and 9 years old. But, I figured I do enough pages about P.J., and as hard as it may be emotionally, I thought I should celebrate my hubby Patrick. While he may not be here very often, he is still The Man.

The first two layouts are photos my hubby sent me from the Ike just weeks ago. They recently made a port call in Dubai, and like any good hubby of an avid/rabid scrapbooker would do, he took pictures for me. I love that he gets me. Warts and all.


Lots of layered circles and stars. It was all spurred by that large dot patterened paper. Love it. So many possibilities!


This next one was inspired by the chipboard sheet. The Badda Bings chipboard was my favorite element of the whole kit. I just had to use lots of thoses yummies. So, I created a little border utilizing them and some of the Basic Grey gummies and the Bo Bunny Buttons & Bling with some pieces handcut from one of the other pp's.


For this last one, I chose the photos that represented family. Besides being a wonderful kit to celebrate the men in your life, it also works perfectly to rejoice in your family as a whole. Love this one...


Check back tomorrow for another fabulous Man of the House Reveal!
scrappinjen

Thursday, May 20, 2010

June's Kit is up for Sale!

I LOVE the masculine feel to this kit! I have so many boys in my house and I have a tough time finding boy papers that aren't too babyish. This kit will be perfect to scrap my boys and also those pictures that I am wanting to get of my kids and their Daddy on Father's Day! Be sure to check back every day this week for the DT reveal of the kit. Misty has already posted her reveal below this post! Check it out!
You can purchase your kit here!

Misty's June Reveal

Ok...so I got my kit on Monday, and with all of the end of the school year activities going on, I was not able to break it open until Tuesday night. When I did....all I could say was WOW. Yes....WOW. Heather did a fantastic job of pairing the embellishments with the Bella papers! This kit is FANTASTIC!

It s no secret that I do not do many masculine layouts or projects...which does not make sense because I have a HOUSE FULL of guys! I am more typically drawn to the frilly side of life...and again, I find that in my layouts with a typically masculine kit! Somehow, I always find a way to make it girly! LOL

Here is "You Gotta Dance" featuring my youngest when she was only a baby. I altered the photo to add in the bubbles, and I used the patterned paper that was in the kit to my advantage...and I pop dotted some of the circles up to look like the bubbles have come out of the photo and onto the page. I made a couple of pinwheels and added the buttons from the kit for the centers. I also used the fabric flowers from the kit to help create a whimsical look to this layout.


Here is a close up:


This is my son...shaving for the first time ever. He actually used my hubby's electric trimmer instead of a razor. I created my left border to represent the stubble...then the right border is clean. I created the "stubble" by fringing the paper then using a toothpick to wrap the ends around and curl it up.


Here is my Fathers' Day card...as folded button down collared shirt! I wanted something a little different...and this is what was the result. the white part is an insert that you can create your message on...pulls out easily. When pulled out....


This is what you get. I put the chipboard sticker on the inside of the shirt for the "tag"...and a little hidden surprise for Dad when he pulls out the insert!

I will have one more project to share with you all soon...so keep your eye out for the June Design Team Challenges on the board!

I have had so much fun creating with this kit! It is sooo perfect and versatile for so many different topics! Head on over to the SO store and pick up your own kit!

Tuesday, May 11, 2010

New DT Member

We have a new DT member! Elizabeth had to step down for personal reasons - I am very sad to see her go! She was a great team member, but I know what she is doing is what is best for her! You will be missed Elizabeth!
I have asked Karry Weaver to be our the new member of the DT. She is super sweet and I love her work - so very talented.
Come on over to the message board and get to know Karry!

Don't forget about the crop this weekend - it ought to be just fabulous! I need this crop so bad. Now if the baby will just cooperate so I can have a few hours of scrappy time!

Friday, May 7, 2010

May Crop is coming SOON!!!

We knew you would all be some busy Mamas this weekend, so we set the crop for the following weekend...so tell your family that you want scrappy time next weekend for part of your gift!!!
This will be a crop honoring Motherhood in general...because without our Mothers...where would we be??? Invite your friends and your friends' friends...tell them to make sure they tell us who sent them...there are prizes involved!!!!!

Also, don't forget to take photos this weekend while you are with your family and loved ones...you just may want those next weekend!

Monday, May 3, 2010

May Photo Challenge

Happy, happy May!! How exciting that all the challenges will be posted on the first Monday of the month now! This is a great way to get ready for summer by scrapping all those Spring photos.

My challenge for you this month is a photo challenge. Specifically to crop and tilt your photos. I discovered this technique a while back on the Jessica Sprague website and have loved it ever since. It gives photos just a little extra something. To do this you will need to open your photo in a photo editing software like photoshop. If you do not have photoshop you can use photobucket and picasa, both are free online photo storage and editing websites.

To do this open your photo with the software. Draw the box around it to crop it. If you put the mouse over any of the corners of the crop box a little curved arrow will show up. Click on the curved arrow and while holding down twist the crop box to the desired direction. Hit the ok button to crop your photo and there you have it a cropped and tilted photo!

Here is my orginal photo and my cropped and tilted photo. I used this one on my May reveal layout for the Pink Plum kit.


Here is the original link to the Jessica Sprague tutorial. I hope you will try this easy technique to spruce up your photos! And don't forget to share them with us in the SO forum to be entered into this month's drawing! You can find all the details HERE!

Mother's Day Make-N-Take

So...who would like an idea for a Super Easy AND inexpensive Mother's Day gift??? I know I would!! I have three Mother's that I give gifts to, so sometimes, something a little less expensive is ideal. Well, today, I am going to give you just that!

An Altered Candle in a Jar~!

I went to Wal Mart and bought a few different candles in a jar...they smell WONDERFUL and are only $5! You can't beat that!!! When I was selecting my candles, I tried to match the colors of the candle to the supplies I knew that I had on hand for the altering part.

For this one, I used the Pumpkin Spice...it is orange in color, and smells sooooooooo good! I know My Mother in Law is going to LOVE this!
SO....once you have your candle, gather the rest of your supplies...
...I used the May Kit for all of my supplies...including the ribbon add on and the GORGEOUS butterfly!! Mod Podge is a must.
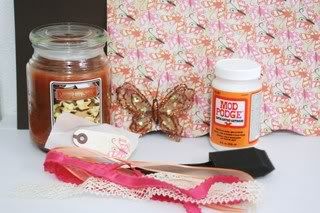
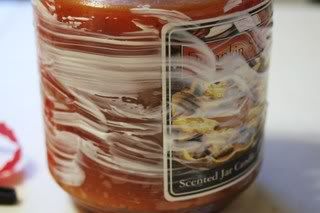
Next, you cut your patterned paper to fit around your jar...so that you can COVER that atrocious UGLY label that is on it. LOL...we are going to make a gorgeous label! You will cover your jar with Mod Podge...this will be your glue. Apply your paper label that you cut out...being sure to center it. Once it is on, you will cover that with Mod Podge again...this is the sealant part. Let it dry for about 15 minutes.
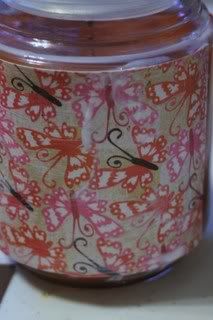

Next, I add a border to the top and bottom of the label. Sometimes it is a ribbon, trim...whatever...this time, I used my loopy Martha Stewart punch and created my own border using some Bazzill brown card stock from the May kit. Use the same steps for applying this as you did for applying the label.
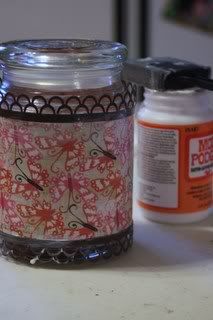
Now you will decorate that lid. Use your circle cutter to cut out a circle from paper to completely cover your lid. Mod Podge your lid, apply the circle, then Mod podge again...let it sit for 15 minutes. While it is drying, you can be assembling your flower for the top.
I used the lacy trim from my kit to make a center of a large lollipop flower. I did use mod podge on the paper to give it stiffness...or you can use a spray sealant...or even just use pre-made flowers...totally up to you!


Once my flower was made, I hot glued my butterfly to the center and hot glued the whole assembly to my lid that had dried while I was working. Oh yea....I did use foam thickers...I find that the foam works a LOT better for forming around the face of the jar than chip board alphas do! LOL...of course you can use whatever you want...Just make it your own! ....Here is my final product.....
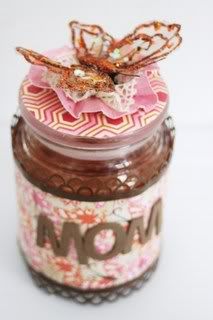


My next task is to make a matching card for this...but that should be super easy with the scraps that I have left over from the FANTABULOUS May Kit!!!
hope you enjoyed this simple Mother's Day Make-N-Take idea! If you make one...please post it in the Simply Obsessed gallery and on our board...we would LOVE to see your creations!

Sunday, May 2, 2010

ChAlLeNgE TiMe ---tItLe

Happy Monday everyone! I have a challenge for you today. My challenge is to use a song title as your layout title. I decided to use the song title "Then" by Brad Paisley. Here is my layout using the May SO Kit:
"THEN"

The photo is one of me when I was about four. (Check out the lovely fabric on the chair--YIKES!) I used the title as a jumping off point for the journaling. It reads: I couldn't have known how perfect my life would be. I just knew that I was happy. I am glad for what I had Then.
Okay, now it is your turn. Pick a song title and create a layout. Then, upload to the gallery and link it to THIS POST on the message board. Be sure to tell us the artist of your song. Can't wait to see what ya got! Have a great day! Susan

Saturday, May 1, 2010

A Make and Take for National Scrapbook Day!

How would you like to make a cute little box flower like this? You know there are 2 things that are all the rage these days in the scrappy industry... banners (love them) and handmade flowers. I discovered these cute little flowers on the Cosmo Cricket blog a few months back. They're super easy to make. If you can close a cardboard box, you can make one of these.

I like to make my flowers with 2 layers. So, I started off with 8 circles, 4 in 2 different sizes. Fold 4 of them in half and crinkle them up for texture.

Now, start layering them. You need to put a small dab of adhesive just right of center and then add the next piece. You will work clockwise around the flower.


The only tricky piece is the last. you need to dab the adhesive on the petal at the same spot, just right of center AND fold the left piece up and dab under there too. You're completing the flower just like you shut a cardboard box, by linking up the sides. Like so...


Once you've done that put a little crease in the top layer, one on each "petal". Then make the next set of cirles into a smaller layer and use a glue dot to adhere to the top of your first flower. Connect them with a brad or a button, you get the picture. Volia!


Now, for my first flower, I simply used punched circles. But, imagine the possibilities. You coul ink the edges of the circles. You could use a scallop punch. You could distress the edges of your circles. The possibilities are endless! For this one I distressed and used a scallop punch...


There you have it. Your very own Make & Take in the comfort of your own home. Happy National Scrapbook Day!
scrappinJen